The basic philosophy of this setup process is LESS ad Groups with MORE Keywords in each Ad Group, focusing on 2-3 Broad Match Keywords with high intent (long-tail). We then build a list of phrase match or exact match keywords from the search terms report and add negative keywords that are low intent. In this method we let Google Algorithms help guide what makes the most sense from a profitability standpoint for the campaign.
*** Note – If this is a new Google ads account ***
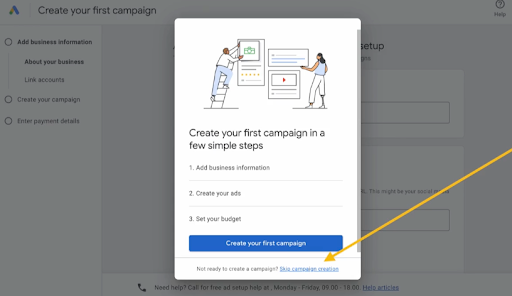
Use the “skip campaign creation” option to exit the automated campaign setup dialog. We don’t want to use the built-in options.
Make sure you also properly configure your country, time zone, and currency. These cannot be changed later and they will affect all your campaigns.
You may have been given a starting ad spend credit on the next page. Set up your payment information to finish the account setup. You may be required to provide payment from a debit account and may not allowed to use a credit card in the near future as of this document creation.
Keyword Research Process
We will begin the process with an old-fashioned brainstorming session just as we did with keyword research for an organic SEO campaign. Follow the steps below:
You can use the built-in keyword planner inside Google Ads (ideally) or the keyword planner module inside SEO Powersuite or any other software you choose for this.
- Write down a list of keywords you would use to find the product or service. What would you google if you were trying to find your client’s product or service you plan to advertise?
- Go into the keyword planner and discover new keywords to get lists of potential keywords by entering your list AND your domain.
- Look for keywords that have at least three words but ideally 4 or more, are high monthly searches, and have low competition.
- Add Keywords to create a plan. Then select keyword plan and download your keywords to Google Sheets to sort into Campaigns and Ad Groups. (Ad Planner)
- Break your keywords into keyword themes using a single keyword theme method (cluster common terms together into themes). This allows you to see which themes are most cost-effective and useful and allows you to pause underperforming ad groups later if necessary.
- Now break your Keyword themes into different campaigns or ad groups. In each group start with 1 or more broad match keywords with 3+ words (long-tail kws).
- After that, you can add more exact-match keywords that are highly relevant phrases you can target from the keyword audit later.

Creating Ad Copy
Some products/services are limited and may be partially restricted. Healthcare, medicines, sexual content, alcohol, copyright & trademarks, gambling, politics, financial services. Ad copy should be clear, professional, relevant, useful & easy to interact with. No Redirections in links. No exclamations or emojis. No FREE, F-r-e-e, Not Gimmicky
Search Ad Copy is short form and has the following character limitations:
Headlines – 3 x 30 characters
Descriptions – 2 x 90 Characters
Display Urls – 2 x 15 characters
Quick Tip: Capitalizing the first letter in every word can help your ad stand out without violating Google’s Ad Policies
Headlines
These are bold and blue and the main focus should be to grab the attention of searchers. You should include keyword focus because this improves CTR and ad quality scores. You can also include a Brand Mention as well as a Strong Call to Action – What do you want them to do and what benefit will they get? CTA in ad copy should match the URL.
Note: Use EMOTIONAL triggers like curiosity, amusement, laughter, sadness, etc.
– Expert Excavation Services | Sale On Now Save Up to 45% | They’ll Never Find the Body| Speedy Holes Dug | Guaranteed Best Price Fill out our fast easy quote form…
Descriptions
This is a great chance to expand on your product or service but make sure to remain on topic to boost ad quality score. What extra info do they need to help drive them to click on your ad?
– Clear Your Land Quickly and Efficiently. Licensed & Insured Land Clearing Experts. Schedule Your Service Today!
Display Paths
These have two main focuses – allow Extra Keyword focus & Targeting as well as act as a CTA. In the example below the “sale” helps signal as a CTA to drive further traffic
– domain.com/we-dig-holes/sale OR domain.com/we-dig-holes/best-price
Three Types of Ads You Can Create in Search Campaigns
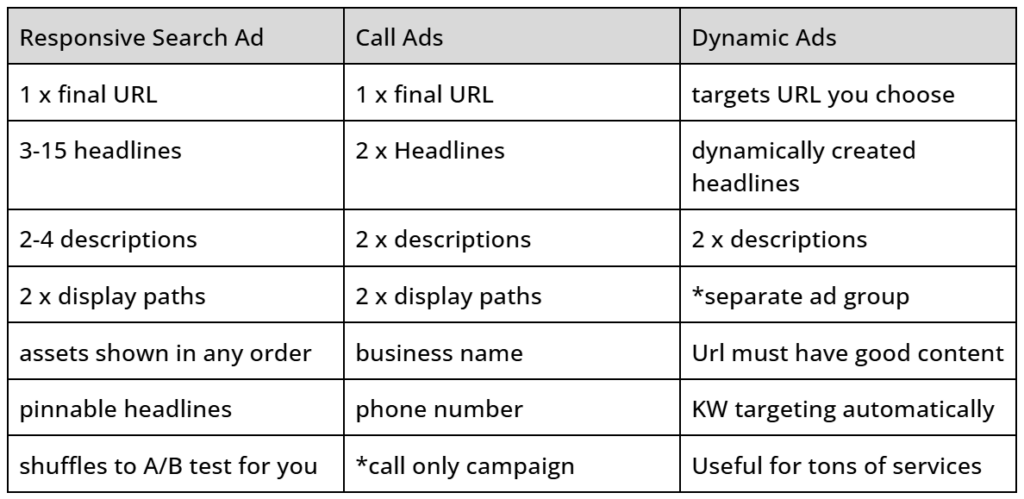
For Responsive Search Ads
Consider the following recommendation for why you should use ONLY 2 ads in each ad group. Typically google will prioritize 2 ads vs showing the 3rd or fourth and will not show them as much. By split testing, we can find an ad with the best metrics to perform for our client.
Split Testing
To test, set up 2 ads per ad group and allow the ads to gather data. You need roughly 2000-3000 impressions for Google to work out the best combinations to split-test your ads themselves. Make sure you only test one main difference for each test.
Dynamic Keyword Insertion
Very useful for insertion related to the search term
These keywords need to be targeted in your campaign to trigger
ex. – {keyword: Window Washer} —> Tucson Window Washer, Arizona Window Washer |
– Split Tests (30 days or at least 500 impressions)
Ad 1 – No pinned headlines
Ad 2 – DKI Pinned in Headline 1
Winner —> Choose the ad with the best CTR & Cost/Conv.
Ad 3 – DKI Pinned in headline 1 & CTA Pinned in headline 2
Ad 2 – DKI Pinned Headline 1
Winner —> Choose the ad with the best CTR & Cost/Conv.
Create Your Ad Copy in Google Sheets first
By updating this ad copy sheet you can keep a record of the different versions of what you have tried and can have a repertoire of options to test out. Make sure this content aligns with your landing pages as well using the following best practices.
Ad Extensions / Ad Assets
These can improve CTR, make ads more appealing, take up more real estate in the SERPs, and steer people to take direct action on your ad when they come across it
Site Extensions – Direct users to other pages of your site
Callout Extensions – Most Exciting qualities of your biz & services
Structured Snippet – Types, styles, Categories of products
Call Extensions – Call Us Now Button
Lead Form Extensions – Can be used for direct access to a form
Location Extension – Adds business address, phone, map, etc
Image Extension – Highlight a product or service via photo
Setting Up a New Campaign
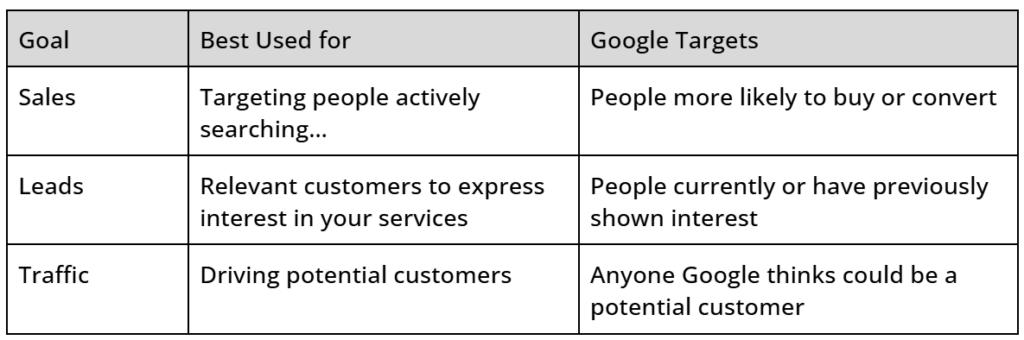
After Clicking the “new campaign” button you will arrive at a screen asking what your campaign objective is. You can only select 1 goal for each campaign that will control where your campaign appears – What is the main purpose of the campaign? If you have multiple goals you may want to set up multiple campaigns. Use the examples below to pick from the 3 options shown for Search Ad Campaigns:
Do you want to Sell a product AND build brand awareness? – 2x campaigns w/ diff goals
*If you don’t already have your Conversions setup, we will skip this and come back to it later on.
Update the campaign name using a good naming convention that clearly shows exactly how each ad is configured so that you know what is performing best.
– Tucson Roofing [Search], Roofing Repair | Tucson Roofing [Search],
Bidding Tab
Start out with a focus on “clicks” to get as much data as possible. You can switch to maximize conversions after you start getting around 30 conversions/mo. Do not check Only bid for new customers unless you have a list to provide current customers.
Networks Tab
Unselect search partners and display. Set up a separate campaign if you want to use display ads.
Location Targeting Tab
For a local service business that services small areas – use Presence Only. This will ensure your ads don’t show for people located outside your service area that is researching your city.
Audience Targeting Tab
Because you don’t start your Campaign without your Audience Data, we want to use the observation Method to get more data for audience segments. Start with 25-30 audiences to get data on those audiences and then eventually exclude those not performing.
*** Note: If you have regulatory issues you can select and add targeting ***
– age restrictions, etc.
More Settings Tab
We recommend using the following settings however, depending on your needs you may alter these as necessary.
Ad Rotation: Prefer best-performing
Start and end dates: Setup start date and remove the end date unless you need it
Ad Schedule: Set as needed
Brand restrictions: Would remove other brands from your campaigns
Keywords & Ads Tab
You should have already done your keyword research and split them into ad groups etc. Set up your ad group names and copy over your pre-sorted ad group keywords. 2-4 broad match keywords that have at least 3 words (long-tail) – Google now targets the “meaning’ of your keyword NOT the words in the keyword phrase. The longer keyword phrases give more insight into your kw intent.
Now is the time to also copy over your ad copy, descriptions, callouts, site link extensions, etc from the kw research and ad copy setup we did earlier.
Budget Tab
Set your daily budget. Keep in mind this daily budget gets averaged out over the cost of the month AND our goal is to get data into the account as efficiently as possible in the beginning. Ideally, you want to get roughly 10 clicks per day. Some days you may overspend and other days you will underspend. Ignore traffic estimates – Google wants you to spend as much as you’re willing to spend.
Review Tab
Check and review settings carefully and publish your campaign. After your campaign is set up you will return to the Ad Groups screen where you can set up additional Ad Groups as needed and wait for bid learning over ~7 days.
Note on Enhanced Conversions
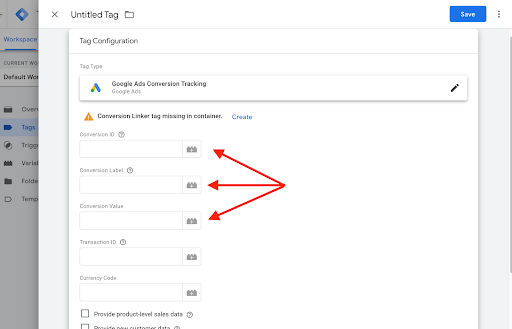
These can help make user tracking more effective by cloaking the user conversion data by giving a unique ID to each interaction. However, you will likely need additional help setting up this conversion tracking. Cookies and Device IDs are slowly phasing out. Tracking is vital so we will set up a separate SOP for conversion tracking that will update as best practices evolve.
Setup Conversion Tracking In Go High Level
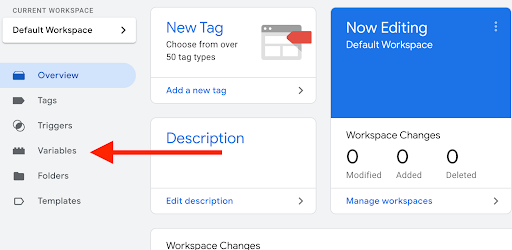
(AM03-05) – How to Setup Google Tag Manager for Conversion Tracking