
Categories

Author: agencymasterm

Google Business Profile Setup & Optimization (AM04-02)

This SOP outlines the standard process for optimizing Google My Business profiles, including posts, key points, review responses, and ongoing monitoring. The objective is to consistently improve our clients’ profile rankings in the local map pack and provide a comprehensive experience for potential clients.

Note – We recommend AVOIDING automation when possible for GMB posts and heatmaps

Onboarding Process & Optimization

Ensure each GMB profile is fully optimized after onboarding. Several of the key points to update and regularly monitor are as follows:

1 Primary & Secondary Categories

Many search terms will only show your business if you have specific categories in your profile. Researching this is simple, make a list of all of your different service offerings and navigate to https://www.google.com/maps

Search for each of your services and observe the common business categories for each of your services using a Chrome extension like GMB Everywhere. If you don’t see a pattern, zoom out on the map to a larger area (entire state) and identify a pattern. Each service will fall under a specific “category” You will want to decide what service you offer that is your primary focus and set that matching category as your primary category.

Include 1-3 additional categories as needed to make sure you cover your services. Do not add any unnecessary categories.

2 Company Description

Utilize the main keyword on the homepage for the business description in the first sentence of the GBP description.

3 Service Areas

Include a handful of service areas however, do not overload your service areas. 6-7 Cities (not counties) listed are plenty for you to cover your service areas. DO NOT list service areas beyond 2 hours from your location. 

4 Business Hours

Ensure the Business hours that are listed on your website match your Google Listing. Consider the “true” availability for your business. 

5 Phone Number

Many will recommend using a tracking number on your Google business profile. If you do, i would recommend that the same number be used on your website (unless you also use DNI) as well as your citation sources. The only downside to this is that it requires a bit of additional work updating your citations if you ever switch tracking numbers.

6 Website URL

This should be the URL for your home page that you would like to connect to your GMB. The layout of this website page should match & reflect the service offerings listed within your GMB as well.

7 Appointment Links

This could be your Contact Us page or another appointment scheduling software that you use. There are many options but make sure it’s filled out, this option may potentially be not shown depending on the business type.

8 Services

Add the services that you provide to your potential customers. One of the most important things to do before this step is to do keyword research and gain an understanding of how you should phrase all of your various service offerings. Be sure to use the highest search volume versions of your services and match this to your website build where possible.

9 Adding Products

Add the products using the same methodology as listed above. Include a link to a landing page on the website corresponding to the service as well as an image. Only use a total of 4 Product categories. We typically will add these incrementally every month instead of all at once.

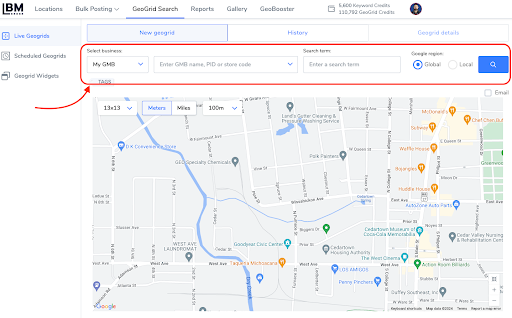
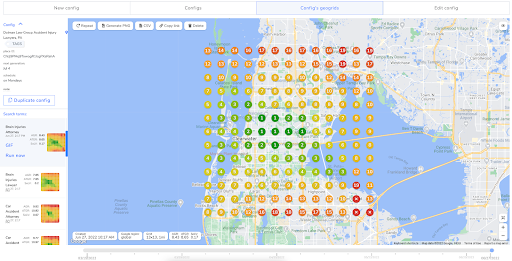
10 Heat Maps / Grid Scans

Conduct an initial baseline Heat Map or Grid Scan for all of your properties and the keywords your client is focusing on during the onboarding process so you have a starting point to reference back to.

Monthly Reviews

Use a heat map or grid scan to review ranking changes and gain insights into rank patterns. This is a great time to connect with the client to understand more about their lead flow in different areas as well as quality to asses your focus moving forward. You can also utilize Bright Local Searches to assess the profile from specific zip codes or areas.

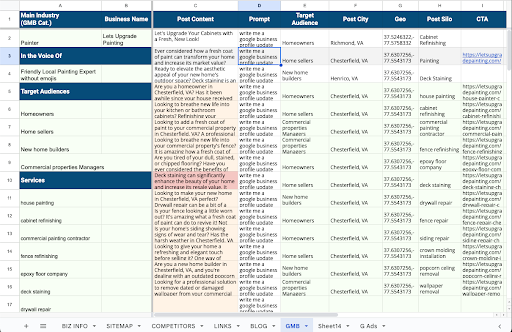
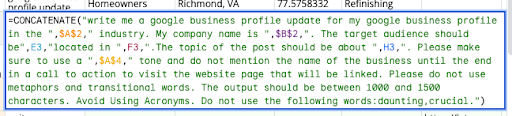
Best Practices for GBP Posts

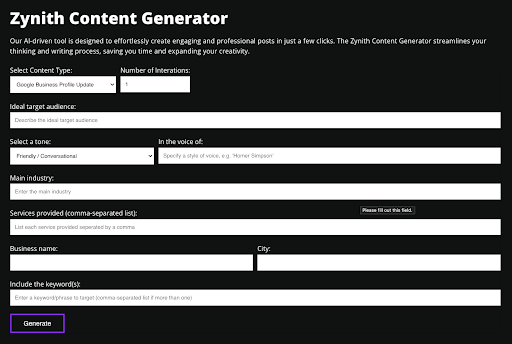
We will typically provide clients with (4) GMB update posts per month – optimized for their

primary service. It’s important to ensure no content duplication across clients within the same state if you have multiple clients.

Best Practices for GBP Products

We will also provide clients with (1) GMB Product Post per month highlighting services offered. Utilize the keyword for your product in the first sentence of the description. 

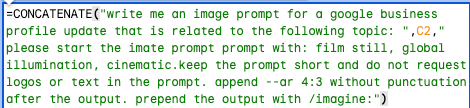
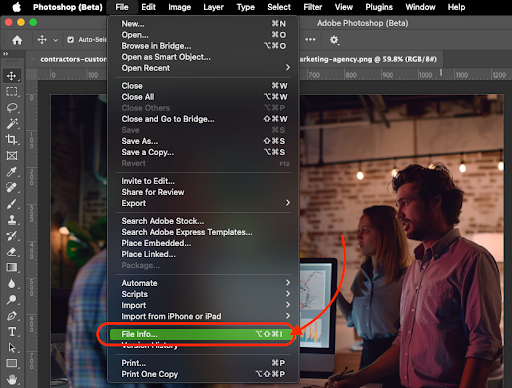
Use engaging images sourced from clients’ websites, social media, or AI-generated from Midjourney Bot. Avoid branded graphics & instead prioritize client-provided images. Make Sure to stay organized with how you store, title, and add alt text to images. The image must match the city modifier of the post to align with the content.

Best Practices for Review Responses

All past review responses should be completed during the client onboarding phase. When a person mentions a service in a review, utilize the service to emphasize the keyword’s relevancy in the response as well. 

Follow the same pattern to respond to all reviews weekly, thanking the client and addressing mentioned keywords or services. 

The Website to GBP Connection

Establish a connection between the website and GMB by housing hyperlinks to the last three posts on the GMB for the service associated with the keyword + city modifier of the home page.

Local Citations Management

Use software or tools to maintain local citations. YEXT is a great option for listings and can be used through SEMRush Local at a discounted rate to ensure consistency and accuracy across various online platforms. There are other options or you can also create these manually yourself as well.

YouTube Video & Social Media Integration

Use the Google Business Profile URL in any YouTube videos published by the company in the description. LinkedIn or Facebook posts will also incorporate the Google Business Profile URL to enhance visibility and engagement across social media platforms.

Building Web 2.0 Backlinks

Once a month, create web 2.0 backlinks from platforms like Blogger and similar websites. Also, Consider building a directory-based website (PBN) acting as a listing directory.

– /best-plumbers-in-chicago/

Use these to include backlinks to clients’ GMBs to gain additional PageRank

Local Grid Scans for Google Business Profile Ranking (AM04-03)

A local grid scan is a diagnostic SEO tool that visualizes the search engine rankings of a business across different geographic locations within a specific area, typically surrounding the actual location of the business. This tool is invaluable for local SEO as it helps businesses understand their visibility in local search results.

Google’s Proximity Algorithm Adjustments

Explain to clients that Google continually adjusts the total proximity reach of GMB listings each year. This is intended to give other competitors a chance to rank and should be viewed as beneficial. It levels the playing field, ensuring that competitors will face similar challenges when trying to penetrate established geographical markets.

The Local Brand Manager Dashboard

Before we begin let’s become acclimated with the LBM dashboard. Most grid tools will provide similar results and display them with these metrics. If you dont have a tool already consider using this discount code we organized with LBM for you:

  • Rank: Position in search results. Ranges typically from 1 (highest) to 20+ (lowest).
  • GPS Coordinates: Longitude and latitude to define specific points in the grid.
  • SERP: Search Engine Results Page
  • EXIF (Exchangeable Image File Format): Metadata stored in images
  • AGR (Average Grid Rank): Average ranking position across all points in the grid
  • ATGR (Adjusted Top Grid Rank): The highest consistent rank in the grid.
  • SoLV (Share of Local Visibility): Visibility a business has in a local grid vs. competitors

The GeoGrid search allows you to see the visibility of a GBP listing for a specific keyword from a number of different latitude and longitude coordinates. This lets you see where you might rank strong and poorly in your listing’s city or surrounding areas.

The GeoGrid rank tracker gives you a view of how your GBP Listing ranks from different positions across one geographic area (a square to be precise).

Creating a Grid Scan in LBM

GeoGrids can be run instantly (Live GeoGrids) or scheduled. Conduct local grid scans 1-2 times per month to monitor and adapt to changes in local search rankings effectively.

Am04 03 1

The required inputs to run a grid are as follows: 

Business Name: This can be entered in one of four ways:

  • My GBP: Select a location already imported into Local Brand Manager
  • Google Search: (only works for non-SAB businesses) 
  • Place ID: input your business Place ID
  • Map URL: input your listings Google Map URL

All four ways suit storefront businesses, but for a Service area business, you can use My GBP and Map URL. 

  • Keyword: the keyword you are searching for
  • Grid Size: how many points you want your grid to have 
  • Point Distance: the distance between each point, in meters or miles

Note: Local Google region is meant for GeoGrid searches outside USA.

To schedule a GeoGrid simply go to GeoGrid Search at the top of your screen and you’ll find yourself on the Scheduled Search page.

 Once you’ve added the keywords you’d like to track and set the settings up, click the “Create Config” button. The settings here are the same as the live GeoGrid search, but here you will set the schedule to when you want the GeoGrid to run.  

Am04 03 2

Once your scheduled GeoGrid has been set up, go to the Configs tab and click on any location to see a report. The menu on the left lets you choose the keyword you’d like to see the results info for.

Am04 03 3

Now…. what do the results mean?

At the most basic level, we are requesting a list of GBPs for a given latitude and longitude and a keyword, for each grid point. We then take the list of GBPs and compare where our business ranks, for each of the points. Color-coding this information allows us to have a “heatmap” of visibility across the grid.

Strategies to Increase Rank

There are many localized strategies that can be implemented in order to boost rank around a localized area that you see as deficient based on your Google Maps grid scans. Consider the following options in your efforts to boost localized area ranking for your clients.

EXIF Data in Images

For areas where rankings are low, prepare images relevant to your business or service that also connect with the local audience. Use software to embed EXIF data into these images, including the precise longitude and latitude of the areas you’re targeting. Incorporate these images into new or existing posts on your website, making sure to mention the area contextually in the content.

Content Creation and Optimization

Create posts that address local issues, events, or interests specific to the areas where you need to improve rankings. Mention local landmarks, news, or events as reference points to enhance local relevance.

Business Owner Posts

Clients should understand that the best way to enhance local grid scans is for their technicians or managers to upload posts and photos directly to Google My Business (GMB) from the area they are working in. This retains all geo-specific data, which is vital for boosting local SEO performance.

Local Link Building

Developing relationships in the community as well as local memberships and communities are great ways to develop local signals Consider the following options: 

Connect with local chambers for inclusion in their business directories or participation in community events.

 Partner with local businesses that have domains including the city or neighborhood name. Consider guest posts, shared promotions, or event sponsorships. 

Work with local news networks for features in local news articles, interviews, or community spotlights. News outlets often provide authoritative backlinks. 

Collaborate with local schools or universities for events, sponsorships, or educational content, which can provide valuable .edu backlinks.

Get Localized Review Signals

Prepare a text message campaign targeting past clients from specific zip codes where increased engagement and reviews are desired. Ask politely for reviews, sharing links that direct them to your Google Business Profile or other relevant review platforms. Ensure the timing of these messages is considerate of customers’ schedules and time zones.

Alternative Marketing Strategies

Paid ads can target specific geographic locations to maintain visibility by using demographic and geographic targeting to reach potential customers in specific areas. 

Clients can also utilize mailers, billboards, local radio ads, or community events to increase brand awareness in targeted locales.

Google Business Profile Post Process (AM04-04)

Use the following best practices to create your Google Business Profile Posts. The process outlined below will explain how you can also use several different tools for generating the content as well as how to add EXIF data into the images via Photoshop.

Post Text Content

  • 1-3 paragraphs -> opening & closing statements mentioning city + service
  • Posts should be engaging and informative
  • Utilize lists and bulletins for readability
  • End each post with a Call To Action
  • Avoid keyword stuffing and ensure humanized edited content
  • Double-check content relevance

Image Content

  • Double-check photo relevance
  • Use the proper image aspect ratio 4:3
  • Add Description data using Photoshop

Using the Google Sheets to Generate Posts

Save a copy of the Google Tracking sheet and navigate to the GMB tab. Our first step is to add the business details and populate the sheet to generate your content. Add the Main GMB category, Business Name, Target Audience, Post Cities, GEO Coordinates, Post Topic, & CTA links. 

Am04 04 1

Modify the prompts as shown below for the Post Generation in Cell “D2” to your desired prompting approach if you prefer and copy your updates to the rest of the column ensuring that the cell references remain intact. 

Am04 04 2

To create the Post Content We must first add the Extension GPT for Sheets. Once it has been activated, in cell “C2” use the formula =gpt(D2). The formula will be replaced by the output as GPT For Sheets runs your prompt. The prompt will consider the data we entered into the green cells earlier. You can simply drag the formula down and generate post content in bulk. 

Am04 04 3

Using Zynith to Generate Posts

Am04 04 4

Go to Zynith.app and access the Zynith Content Generator. If you need to purchase a subscription to gain access you can use discount code XYZ. The Content Generator tool allows you to enter the following information:

  • Number of Iterations: How many total outputs will the tool generate
  • Ideal target audience: Who are you writing the post for
  • Select a tone: Pick a tone from the drop-down
  • Main industry: The main category of the Google Business Profile
  • In the voice of: Specify a style of voice if desired
  • Services Provided: Enter the main service for the post
  • Business name: Name of the client’s business
  • City: Add a city that the post is optimized for
  • Include the Keywords: Add any additional keywords for the post

Am04 04 5

You can now edit your outputs in the web browser as needed if you would like to make any modifications before copying the content into the post-content entry box or any location you choose to store your posts if you are creating them in advance. 

Google Business Profile Post Images

Images can be gathered in several different ways. You can use stock photos or generate images with an AI image-prompting tool such as Midjourney. If you are using the Google Tracking Sheet listed above for your GMB content, it contains a prompt for generating images based on your GMB post data as well that you can use. Modify as needed.

Am04 04 6

Adding EXIF Data

EXIF Data is generally stripped from images as they are uploaded to Google. However, there is one workaround that appears to retain data in the image file even after Google appears to sanitize it before publicly posting. Here is how we add it: 

Am04 04 7

  1. Open Your image in Photoshop or Photoshop (beta)
  2. Access File Info and add EXIF data in the specified format ONLY in the description field: Naturalized sentence with keyword + city modifier about the picture | Longitude and Latitude from Wikipedia for the city of interest.

(the Tracking Sheet generates this for you)

  1. Format the data naturally with accurate geographical information
  2. Cross-check and save changes, documenting them for reference

Am04 04 8

Note: there is a tool to add this information in bulk if desired – Metadata from CSV

Google Business Profile Creation & Verification (AM04-01)

“Preparation prevents frustration.”
– Schieler Mew

Step 1: Understand Why This Matters

Objective: Recognize video verification as the new standard, and prepare accordingly.

Key Points:

  • Google now defaults to video as the primary (and often only) path to verify a GBP.
  • The process is notoriously buggy; most failures happen during upload. Avoiding them is 90% preparation.
  • Getting verified quickly means fewer delays, better rankings, and faster ROI from your local presence.

Don’t wing this. Win this.

Step 2: Run a GBP Hygiene Check

Objective: Align all public-facing business info before you record.

Action Steps:

  • Audit your business Name, Address, and Phone (NAP) on:
    • Your website
    • Yelp, Facebook, LinkedIn
    • BBB and industry directories
  • Fix any inconsistencies before beginning verification.
  • Review GBP guidelines, missing signage, mismatched categories, or unclaimed listings can trigger denials.

Mismatched data silently kills verification attempts. Fix it once. Do it right.

Step 3: Prep Your Device and Settings

Objective: Set your phone or tablet up for a smooth, bug-free recording session.

Action Steps:

  • Use a stable internet connection; Wi-Fi or 5G preferred. No hotspots.
  • Enable location, camera, and mic permissions for the Maps app.
  • Reduce resolution to 720p or lower to keep the file under 100MB.
  • Clear old attempts in GBP Dashboard:
    • Settings → Video Verification → Delete recordings
  • Target a final runtime under 2 minutes. (0:49 = good. 2:12 = bad.)

Less is more. Shorter videos upload faster and fail less.

Step 4: Plan Your Proof: The Four Pillars

Objective: Show Google you’re a real, operating business using visual evidence.

Include These Segments:

  • Location: Exterior signage, street sign, curb view.
  • Access: Unlock the door or start the vehicle.
  • Operations: Show tools, workstations, software, or POS system.
  • Docs: Briefly flash a utility bill, license, business card, or invoice.

One take. Four proofs. Done right, once is enough.

Step 5: Use the Right Script Based on Business Type

Objective: Customize your video flow to your actual business model.

Choose the Script That Fits:

  • Storefront Business:
    • Start at the street, show signage and unlock the door.
    • Pan across products or workstations.
    • Show POS system, then flash a business license or card.
  • Service-Area Business (with Vehicle):
    • Show vehicle branding + street sign.
    • Unlock and start the vehicle.
    • Film tools or equipment in the vehicle.
    • Flash documents from glovebox.
  • Home-Based Business:
    • Start at exterior address number, unlock the door.
    • Walk to your home office and show your computer setup.
    • Show business software in use.
    • Flash utility bill, invoice, or tax doc.

Tailor the story to your reality. Google’s watching for authenticity.

Step 6: Upload With Precision

Objective: Submit the video correctly the first time.

Action Steps:

  • Open the Google Maps app ➜ Tap “Get Verified” ➜ Choose “Capture Video”.
  • Record the video in one continuous take. Don’t pause or edit.
  • Tap “Stop” and upload while still onsite (same location as shown).
  • Wait up to 5 business days. Check your dashboard daily for updates.
  • Google often won’t email you, look for the blue checkmark directly in Search.

Speed matters, but location accuracy matters more.

Step 7: What If You Fail?

Objective: Know how to fix and retry without losing momentum.

Action Steps:

  • If rejected, look for the reason. It’s usually vague, but fix anything obvious.
  • Delete the failed video and record a new one with corrections.
  • If all else fails, go to the support tool → “Can’t verify” → Submit:
    • Photos of signage, interior, workspace, etc.
    • Utility bills, business license, or state registration.

Fail forward. Each attempt teaches you something the algorithm won’t.

Quick Copy/Paste SOP

  • ✅ Audit NAP & GBP compliance
  • ✅ Prep documents, tools, script (under 2 minutes)
  • ✅ Enable location/camera, set 720p, delete old uploads
  • ✅ Shoot: Location → Access → Operations → Docs
  • ✅ Upload immediately, on-site, over Wi-Fi or 5G
  • ✅ Wait 5 business days ➜ Check for blue badge
  • ❌ If rejected: Fix, retry, or escalate to support

Run the play. Skip the headache. Nail your verification.

How to Setup an Automated Bidding Campaign on Google Ads (AM03-03)

The basic philosophy of this setup process is LESS ad Groups with MORE Keywords in each Ad Group, focusing on 2-3 Broad Match Keywords with high intent (long-tail). We then build a list of phrase match or exact match keywords from the search terms report and add negative keywords that are low intent. In this method we let Google Algorithms help guide what makes the most sense from a profitability standpoint for the campaign.

*** Note – If this is a new Google ads account ***

Am03 03 1

Use the “skip campaign creation” option to exit the automated campaign setup dialog. We don’t want to use the built-in options.  

Make sure you also properly configure your country, time zone, and currency. These cannot be changed later and they will affect all your campaigns

You may have been given a starting ad spend credit on the next page. Set up your payment information to finish the account setup. You may be required to provide payment from a debit account and may not allowed to use a credit card in the near future as of this document creation. 

Keyword Research Process

We will begin the process with an old-fashioned brainstorming session just as we did with keyword research for an organic SEO campaign. Follow the steps below:  

You can use the built-in keyword planner inside Google Ads (ideally) or the keyword planner module inside SEO Powersuite or any other software you choose for this. 

  1. Write down a list of keywords you would use to find the product or service. What would you google if you were trying to find your client’s product or service you plan to advertise?
  2. Go into the keyword planner and discover new keywords to get lists of potential keywords by entering your list AND your domain.
  3. Look for keywords that have at least three words but ideally 4 or more, are high monthly searches, and have low competition.
  4. Add Keywords to create a plan. Then select keyword plan and download your keywords to Google Sheets to sort into Campaigns and Ad Groups. (Ad Planner)
  5. Break your keywords into keyword themes using a single keyword theme method (cluster common terms together into themes). This allows you to see which themes are most cost-effective and useful and allows you to pause underperforming ad groups later if necessary.
  6. Now break your Keyword themes into different campaigns or ad groups. In each group start with 1 or more broad match keywords with 3+ words (long-tail kws). 
  7. After that, you can add more exact-match keywords that are highly relevant phrases you can target from the keyword audit later.

Am03 03 2

Creating Ad Copy

Some products/services are limited and may be partially restricted. Healthcare, medicines, sexual content, alcohol, copyright & trademarks, gambling, politics, financial services. Ad copy should be clear, professional, relevant, useful & easy to interact with. No Redirections in links. No exclamations or emojis. No FREE, F-r-e-e, Not Gimmicky

Search Ad Copy is short form and has the following character limitations:

Headlines – 3 x 30 characters

Descriptions – 2 x 90 Characters 

Display Urls – 2 x 15 characters

Quick Tip: Capitalizing the first letter in every word can help your ad stand out without violating Google’s Ad Policies

Headlines

These are bold and blue and the main focus should be to grab the attention of searchers. You should include keyword focus because this improves CTR and ad quality scores. You can also include a Brand Mention as well as a Strong Call to Action – What do you want them to do and what benefit will they get? CTA in ad copy should match the URL. 

Note: Use EMOTIONAL triggers like curiosity, amusement, laughter, sadness, etc.

– Expert Excavation Services | Sale On Now Save Up to 45% | They’ll Never Find the Body| Speedy Holes Dug | Guaranteed Best Price Fill out our fast easy quote form…

Descriptions

This is a great chance to expand on your product or service but make sure to remain on topic to boost ad quality score. What extra info do they need to help drive them to click on your ad?

– Clear Your Land Quickly and Efficiently. Licensed & Insured Land Clearing Experts. Schedule Your Service Today!

Display Paths

These have two main focuses – allow Extra Keyword focus & Targeting as well as act as a CTA. In the example below the “sale” helps signal as a CTA to drive further traffic

– domain.com/we-dig-holes/sale OR domain.com/we-dig-holes/best-price

Three Types of Ads You Can Create in Search Campaigns

Am03 03 Table

For Responsive Search Ads

Consider the following recommendation for why you should use ONLY 2 ads in each ad group. Typically google will prioritize 2 ads vs showing the 3rd or fourth and will not show them as much. By split testing, we can find an ad with the best metrics to perform for our client. 

Split Testing

To test, set up 2 ads per ad group and allow the ads to gather data. You need roughly 2000-3000 impressions for Google to work out the best combinations to split-test your ads themselves. Make sure you only test one main difference for each test.

Dynamic Keyword Insertion

Very useful for insertion related to the search term

These keywords need to be targeted in your campaign to trigger

ex. – {keyword: Window Washer} —> Tucson Window Washer, Arizona Window Washer


– Split Tests (30 days or at least 500 impressions)

Ad 1 – No pinned headlines

Ad 2 – DKI Pinned in Headline 1

Winner —> Choose the ad with the best CTR & Cost/Conv.


Ad 3 – DKI Pinned in headline 1 & CTA Pinned in headline 2

Ad 2 – DKI Pinned Headline 1

Winner —> Choose the ad with the best CTR & Cost/Conv.

Create Your Ad Copy in Google Sheets first

By updating this ad copy sheet you can keep a record of the different versions of what you have tried and can have a repertoire of options to test out. Make sure this content aligns with your landing pages as well using the following best practices.

Ad Extensions / Ad Assets

These can improve CTR, make ads more appealing, take up more real estate in the SERPs, and steer people to take direct action on your ad when they come across it

Site Extensions – Direct users to other pages of your site

Callout Extensions – Most Exciting qualities of your biz & services

Structured Snippet – Types, styles, Categories of products

Call Extensions – Call Us Now Button

Lead Form Extensions – Can be used for direct access to a form

Location Extension – Adds business address, phone, map, etc

Image Extension – Highlight a product or service via photo

Setting Up a New Campaign

After Clicking the “new campaign” button you will arrive at a screen asking what your campaign objective is. You can only select 1 goal for each campaign that will control where your campaign appears – What is the main purpose of the campaign? If you have multiple goals you may want to set up multiple campaigns. Use the examples below to pick from the 3 options shown for Search Ad Campaigns: 

Do you want to Sell a product AND build brand awareness? – 2x campaigns w/ diff goals

Am03 03 Table2

*If you don’t already have your Conversions setup, we will skip this and come back to it later on. 

Update the campaign name using a good naming convention that clearly shows exactly how each ad is configured so that you know what is performing best.

– Tucson Roofing [Search], Roofing Repair | Tucson Roofing [Search],  

Bidding Tab

Start out with a focus on “clicks” to get as much data as possible. You can switch to maximize conversions after you start getting around 30 conversions/mo. Do not check Only bid for new customers unless you have a list to provide current customers. 

Networks Tab

Unselect search partners and display. Set up a separate campaign if you want to use display ads. 

Location Targeting Tab

For a local service business that services small areas – use Presence Only. This will ensure your ads don’t show for people located outside your service area that is researching your city.

Audience Targeting Tab

Because you don’t start your Campaign without your Audience Data, we want to use the observation Method to get more data for audience segments. Start with 25-30 audiences to get data on those audiences and then eventually exclude those not performing. 

*** Note: If you have regulatory issues you can select and add targeting ***

– age restrictions, etc. 

More Settings Tab

We recommend using the following settings however, depending on your needs you may alter these as necessary.

Ad Rotation: Prefer best-performing

Start and end dates: Setup start date and remove the end date unless you need it

Ad Schedule: Set as needed

Brand restrictions: Would remove other brands from your campaigns

Keywords & Ads Tab

You should have already done your keyword research and split them into ad groups etc. Set up your ad group names and copy over your pre-sorted ad group keywords. 2-4 broad match keywords that have at least 3 words (long-tail) – Google now targets the “meaning’ of your keyword NOT the words in the keyword phrase. The longer keyword phrases give more insight into your kw intent. 

Now is the time to also copy over your ad copy, descriptions, callouts, site link extensions, etc from the kw research and ad copy setup we did earlier.

Budget Tab

Set your daily budget. Keep in mind this daily budget gets averaged out over the cost of the month AND our goal is to get data into the account as efficiently as possible in the beginning. Ideally, you want to get roughly 10 clicks per day. Some days you may overspend and other days you will underspend. Ignore traffic estimates – Google wants you to spend as much as you’re willing to spend. 

Review Tab

Check and review settings carefully and publish your campaign. After your campaign is set up you will return to the Ad Groups screen where you can set up additional Ad Groups as needed and wait for bid learning over ~7 days. 

Note on Enhanced Conversions

These can help make user tracking more effective by cloaking the user conversion data by giving a unique ID to each interaction. However, you will likely need additional help setting up this conversion tracking. Cookies and Device IDs are slowly phasing out. Tracking is vital so we will set up a separate SOP for conversion tracking that will update as best practices evolve. 

Setup Conversion Tracking In Go High Level

(AM03-05) – How to Setup Google Tag Manager for Conversion Tracking

How to Setup Google Tag Manager for Conversion Tracking (AM03-05)

Create A Google Tag Manager Account

Navigate to the home page using the link below and Create your account. In the Account Name Field enter the name of your client’s company or business unit. Click into the Container name field add the website domain name and select the “web” option, then click Create.  

After Accepting the Data Processing Terms you will be left with a Head and Body Code you need to copy and inject into every page on your website. These must be placed within the <head> and <body> tags on each page. This is a standard function included in most SEO Plugins including Zynith

Add Variables for Triggers

Next, we need to add the variables for your tag configuration. Select Variables and then configure in order to open the options to select the variables you want to use. Add “Page URL” and “Click URL” for conversion tracking then click “Close screen” when you have the variables chosen.

Am03 05 1

Add Triggers

Next, we will configure the Triggers that we need to finish setting up our Google Tag for conversion tracking to work properly. We will use a phone call and a thank you page-view to help trigger the tag. 

Phone Call Trigger

Begin by selecting the triggers option in the left hand navigation menu and select “New”. Name your Trigger Phone Calls in the top left corner and select the pencil icon to configure a trigger for “Just Links”. Select “Some Link Clicks” from the options and click the first dropdown then select “Click URL”. Now add “tel:” to the last field then save and return to the trigger configuration screen.

Thank You Page Trigger

Create another Trigger and name it Lead Forms then select the pencil icon to configure a trigger for “Page View”. Select “Some Page Views” from the options and click the first dropdown then select “Page URL”. Now add “thank-you” to the last field then save and return to the trigger configuration screen.

Configure the Tags

To Properly set up conversion tracking we need to configure a Conversion Linker tag as well as a tag that will fire for Phone Calls & Lead Forms. Follow the steps below to set all three of these tags up. 

Conversion Linker

Start by selecting Tags in the menu and then click New to set up a New Tag. Name your first tag Conversion Linker and open the “Triggering” menu. Select the “All Pages” trigger and click add, then open up the tag conversion and select the option for “Conversion Linker”. Under “Linker Options” enable linking on all page URLs & Click Save. 

Phone Call Tag

Click New to set up a New Tag. Name your first tag Phone Call and open the “Triggering” menu again select the trigger for phone calls then click Add. Under “tag Configuration” Select Google Ads & Conversion Tracking then add the Conversion ID and the Conversion Label from your Google Ads Conversion Action to bind the two together. 

  • See (AM03-02) for the creation of Google Ads Conversion Action

Set the Conversion Value to “1” and Save the Trigger to move on to our final Tag. 

Lead Form Tag

Click New to set up a New Tag. Name your first tag Lead Forms and open the “Triggering” menu again select the trigger for lead forms then click Add. Under “tag Configuration” Select Google Ads & Conversion Tracking then add the Conversion ID and the Conversion Label from your Google Ads Conversion Action to bind the two together. Set the Conversion Value to “1” and Save the Trigger to move on to our final Tag. 

Now that our tags and triggers are properly configured, we need to remember to SUBMIT the container AND Publish. Label the version as Google Ads conversion and you’re all done!  Note: Test and manually confirm that the triggers are firing tags properly. 

Am03 05 2

How to Create a Great Landing Page for Google Ads (AM03-06)

When Creating landing pages keep the following information in mind. Your Landing page should help increase conversions across all campaigns and each individual ad group should contain its own landing page. Create these on your website using your standard builder. 

Landing Page Ad Copy & Hero Section

Ensure that the landing page content aligns with the ad copy by reflecting the same offer and verbiage. There should be a direct alignment between the Searcher connecting with your offer (shown in ad copy) and the landing page copy once they arrive on the page. This will significantly improve the conversion rate. 

Urgency Tactics

Implement countdown timers or other urgency-inducing elements on the landing page using appropriate tools or code. These can help increase conversion rates and turn people who end up on your ads landing page into paying customers.

Ex. – Countdown timers around sales or promotions

Establishing Trust & Credibility

Incorporate elements that build trust and credibility with the visitors. This is one of the most important things you can do. Personalize these elements as much as possible to the service or the location attached to each landing page where you can. Consider displaying customer testimonials or reviews to showcase positive feedback or Include trust badges or certifications to highlight your credibility.

Also make sure to provide clear contact information, including phone number and email address. Landing page forms should redirect to your “Thank-You” page to ensure proper tracking (domain.com/thank-you). Make sure you include both a form AND a phone number for customers to call. Some industries and demographics prefer one method over another. 

Call-to-Action (CTAs)

The CTA should be clear, compelling, easy to find, and in alignment with any CTAs listed in your Google Ad Copy. Use the customer’s POV and action-oriented language for the best results. 

– Get Started, Sign Up Now, Claim My Offer, Get My Estimate

Make sure your CTA buttons and graphic elements also have proper contrast ratios and are prominently placed. Test designs as needed to optimize conversions. Place multiple CTAs throughout the landing page to ensure visitors can easily take action.

Responsiveness & Speed

Ensure the landing page is fully responsive and provides a great user experience on all devices. Ensure all interactive elements (buttons, forms) are easily accessible and functional on mobile devices. Avoid using pop-ups or elements that can be disruptive on smaller screens.

Compress images and other media to reduce file sizes without compromising quality.

Use a reliable hosting provider to ensure your site performs well. Minimize the use of heavy scripts and plugins that can slow down the page. Utilize content delivery networks (CDNs) to improve load times for visitors in different locations. Page speed should load quickly enough on a slow internet connection that the page loads in less than 1.5 seconds.

A/B Testing & Optimizing Landing Page Content 

Regularly conduct A/B testing to optimize the landing page performance. Test one element at a time, such as headline, CTA, images, or form fields, to identify what works best. Analyze the results and implement the winning variations to improve conversion rates continuously. 

Repeat the testing process regularly to adapt to changing user preferences and behaviors. Consider using software such as Hotjar or Microsoft Clarify to gain insights into your landing page performance via heatmaps. In the example to the right, you can see a heatmap from hotjar. 

Compliance and Accessibility

Ensure the landing page complies with relevant regulations and is accessible to all users.

Guidelines for Compliance and Accessibility. Include a privacy policy link to inform users about data collection practices. Ensure the landing page meets ADA (Americans with Disabilities Act) compliance standards – elements must have proper spacing and color contrast. Make sure to use descriptive alt text for images to aid screen readers.

Sample Landing Page

The Landing page example here utilizes several examples of what was mentioned above to help build credibility as well as direct users toward filling out a form. You’ll notice that the form AND a phone number was included. This phone number and form have a direct connection into a client snapshot within go high level that allows me to track phone calls & Forms to address lead flow quality.

Am03 06 1

You will also notice that the common questions, objections, etc are addressed on the page to again help push the user to feel comfortable and excited to ask for additional information via the contact methods. 

Because this is a landing page for a single personal service provider I have elected to use his image on the page several times to help build recognition I have also included reviews directly from his Google business profile page that updates regularly and logos of prominent law-related review platforms or certifications to build additional credibility.

How to Setup a Manual Bidding Campaign on Google Ads (AM03-02)

“Manual bidding gives you control. Control gives you clarity.”
– Schieler

Foundations: Manual Bidding Campaign Setup in Google Ads

Manual bidding lets you control performance without relying on Google’s automation. It’s slower upfront, but smarter long-term, if you understand what you’re doing.

Data gets you leverage. Manual bids let you pull the right levers.

Before You Start…

  • Use a naming convention that reflects your campaign and ad group structure.
  • Make sure your landing pages are built and dialed in first.
  • Stick to phrase match unless you really know what you’re doing with broad or exact.

This SOP is built for control and clarity, not shortcuts.

Step 1: Campaign Setup

  • Log into your Google Ads account
  • Click the “+ Campaign” button and select “New Campaign”
  • Choose a goal like “Website traffic”
  • Select your conversion goals (use default if none are created)
  • Choose “Search” as your campaign type
  • Enter your website URL
  • Name your campaign using a clear naming convention
  • Uncheck Google Search Partners and Display Network
  • Use pin drop radius targeting for accurate location control
  • Edit Location Options and choose “Presence: People in or regularly in your targeted location”
  • Turn off broad match keywords by default
  • Click “More Settings” and adjust:
    • Ad Rotation: Set to “Do not optimize”
    • Schedule: Run 24/7 or use preferred schedule. 24/7 is ideal for lead gen if using follow-ups

Step 2: Bidding Settings

  • Go to campaign settings after setup
  • Under “Bidding,” click “Change bid strategy”
  • Select “Manual CPC” directly
  • Under “More Settings,” uncheck “Enhanced CPC” to retain full manual control

Manual CPC keeps your cost predictable and transparent.

Step 3: Geo Targeting

  • Use radius targeting for best accuracy, it relies on device GPS rather than IP addresses
  • Under Location Options, select “Presence: People in or regularly in your targeted locations”

Step 4: Ad Group Structure

  • Click the “Ad Groups” tab and create a new ad group
  • Name the ad group based on the service type
  • Stick to 1-3 ad groups per campaign max
  • Consider a 3rd ad group for competitor name bidding if budget allows
  • Example: For “Repipe,” use:
    • Repipe General (phrase match)
    • Repipe Branded (company name terms)
    • Repipe Competitors (only if budget allows)

Step 5: Keyword Selection

  • Click the “Keywords” tab inside each ad group
  • Add no more than 10 phrase match keywords per group
  • Keywords should align directly with the ad group service type
  • Example for Repipe:
    • “Repipe Company”
    • “Repipe Service”
    • “Repiping Plumber”

Step 6: Ad Copy Creation

  • Navigate to the Ads tab or do it during setup
  • Create a Text Ad with:
    • 3 Headlines (pinned)
    • 2 Descriptions
  • Headline tips:
    • Lead with a direct offer
    • Mention total reviews in the area
    • Highlight your USP
  • Descriptions: Support the headlines with extra details

Ads don’t just need to match the keyword, they need to win the click.

Step 7: Column Adjustments

  • Go to Ad Group view, click “Columns” then “Modify Columns”
  • Add the following for smart bidding adjustments:
    • Top IS (Impression Share)
    • Top-of-page bid (high range)
    • First-page bid (high range)
  • Note: These may take 1-2 weeks to populate

Step 8: Negative Keywords

  • Go to “Keywords” tab, then click “Negative keywords”
  • Add your master list of phrase match negatives
  • Include surrounding competitor names if you’re not targeting them with a separate ad group

Step 9: Conversion Tracking Setup

  • Go to Tools > Goals > Conversions > Summary
  • Click “+ New Conversion Action” > Website > Add your site > Click Scan
  • Select “Add a conversion action manually”
  • Choose “Contact” as the goal
  • Name it (example: Phone Calls or Lead Forms)
  • Set value as “1”, count as “One”
  • Attribution: Set to “Last Click”
  • Click Done, then Agree and Continue
  • Select “Use Google Tag Manager”
  • Copy Conversion ID and Label and insert into GTM

If you can’t measure the win, it doesn’t count.

Step 10: Search Term Review

  • Go to “Keywords” tab, click “Search Terms”
  • Review actual search queries from users
  • Add phrase match negatives to filter out junk or irrelevant terms

Step 11: Ongoing Bid Adjustments

  • Review Top-of-page and First-position bid columns regularly
  • Bid just above top-of-page, but avoid first position overpay
  • DOJ court docs revealed Google adds 20% markup to top bidders. Use that intel.
  • Always test landing pages to improve conversion rates

Helpful SOPs:

  • (AM03-06) – How to Create a Great Landing Page for Google Ads

Manual gives you control. Control lets you spend smarter, not more.

Book List to Deepen These Skills

Google Ads & Paid Traffic

  • Ultimate Guide to Google Ads by Perry Marshall
  • Advanced Google AdWords by Brad Geddes
  • Digital Marketing For Dummies by Ryan Deiss & Russ Henneberry

Optimization, Strategy & Conversion

  • Landing Page Optimization by Tim Ash
  • Digital Persuasion by Erin Gargan
  • Hooked by Nir Eyal

Copywriting & Offers

  • Cashvertising by Drew Eric Whitman
  • The Adweek Copywriting Handbook by Joseph Sugarman
  • Breakthrough Advertising by Eugene Schwartz

Understanding a Google Ads Campaign Structure (AM03-01)

“Campaign structure is strategy. Good ads start with a good plan.”
– Schieler

Foundations: Understanding Google Ads Campaign Structure

You cannot optimize what you cannot structure. The way you build your ad account is the backbone of everything else. Get this right, and every optimization, budget tweak, or split test down the road gets easier.

Confused structures waste money. Clear structures print results.

Before You Start…

  • Review your products, services, and locations. List them out, you’ll need to map these to your campaigns or ad groups.
  • Decide who manages budgets. Who’s in charge of turning things up or down?
  • Make sure you have landing pages ready. Bad landing pages = wasted spend.

Questions are welcome. If you get stuck, ask before you launch.

Step 1: Ad Account Level

  • This is your HQ. Everything sits under here: Campaigns, Ad Groups, Ads.
  • You can have unlimited Campaigns and Ad Groups under one account, so don’t overthink limits.

Step 2: Campaign Level

  • Main job: Control budget and high-level targeting.
  • Set up different campaigns for products, themes, or locations that need separate budgets or schedules.
  • Use campaigns to split niche, high-intent keywords from generic, high-volume stuff.
  • Settings to configure:
    • Budget
    • Ad Schedule
    • Network Targeting
    • Location Targeting
    • Bid Strategy
    • Device Preferences
    • Audiences
    • Demographics

Your campaign is your “container”,  keep your themes separated for control.

Step 3: Ad Group Level

  • Each Ad Group should stick to a single, tight keyword theme.
  • Group keywords so only one ad gets triggered for each user search. No overlap.
  • Want to show specific images or videos to a segment? Use separate Ad Groups.
  • Each Ad Group should go to its own landing page for max relevance.
  • Settings here:
    • Audience targeting
    • Demographics

The tighter your themes, the better your Quality Score and results.

Step 4: Individual Ads

  • Multiple ads per Ad Group is fine. Test different ad copy, titles, descriptions, and use Dynamic Keyword Insertion if needed.
  • Add different extensions or options for granular A/B testing.
  • Let Google show the best performing ad more often over time.

Great campaigns test fast, keep winners, and never stop iterating.

What’s Next?

  • Pick an approach and get started. Don’t try to build the “perfect” campaign, you’ll optimize as you learn.
  • Manual and automated bidding both work. Use our guides below to launch faster:
    (AM03-02) – How to Setup Google Ads Manual Bidding
    (AM03-03) – How to Setup Google Ads Automated Bidding
    (AM03-06) – How to Create a Great Landing Page for Google Ads
  • You can mix and match later or go hybrid. Just don’t change everything at once until you understand what is working.
  • Always make sure your landing page is built to convert. Ads can only get you so far.

Structure is a living thing. Review and adjust as you go.

Book List to Deepen These Skills

Paid Search & Digital Advertising

  • Ultimate Guide to Google Ads by Perry Marshall, Mike Rhodes & Bryan Todd
  • Killer Facebook Ads by Marty Weintraub
  • Paid Search Strategies by Brad Geddes

Copywriting & Conversion

  • Made to Stick by Chip Heath & Dan Heath
  • Building a StoryBrand by Donald Miller
  • Cashvertising by Drew Eric Whitman

Landing Pages & Optimization

  • Landing Page Optimization by Tim Ash
  • Don’t Make Me Think by Steve Krug
  • Invisible Selling Machine by Ryan Deiss

How to Optimize Your Images for a Website (AM02-08)

“Every pixel is a signal. Treat your images like content, not decoration.”
– Schieler

Foundations: Image SEO & Optimization Strategy

Image optimization isn’t just about compression, it’s about communication. Properly optimized images reduce load times, increase crawlability, and reinforce keyword relevance across the board. Done right, your images become contextual signals that support the page, not just visual fluff.

Images without intent are dead weight. Images with metadata are keyword artillery.

Before We Begin…

  • Get the images early: Ask clients for 10+ images per service during onboarding. Don’t wait till the build is half done.
  • Use the onboarding call: Prompt them to come ready with folders, Google Drive, or Dropbox links.
  • Choose your tools: Lightroom, Photoshop, or any software that supports batch resizing and metadata editing.

Optimization starts with prep. What you get early defines how clean your outputs are.

Step 1: Resizing Images

  • Big files slow your site down. Resize using “long edge” between 1200 and 1600 pixels.
  • Never upscale low-quality images. You’ll just pixelate junk.
  • Edit for basic clarity: brightness, contrast, and sharpness go a long way.
  • Preferred tools: Photoshop, Lightroom, or similar with export presets.

Capture One Export Settings:
Resize long edge: 1600px
File type: JPEG or WebP
Quality: 70-80%

Load speed is a ranking factor. Image size is your lever.

Step 2: Renaming Images

  • Hero and First Image on Page: Always include location and service in the file name.
  • Examples: painter-cedartown-ga-hero.png, painting-contractor-cedartown-ga.jpg
  • Other On-Page Images: Focus on secondary keywords. Location tag optional unless helpful.
  • Examples: painting-contractor-refinishing-drywall-sheetrock.png
  • Non-Service or General Pages: Name based on content. Use for “about”, “contact”, or trust-building images.
  • Examples: team-photo-of-xyz-company.jpg, contact-the-team-xyz-company.jpg

Google reads file names. Use them to reinforce your on-page targeting.

Step 3: Adding Metadata

  • Alt Text: Add in WordPress or your CMS. Defaults to filename unless manually updated. Add purpose and keywords if relevant.
  • Descriptions: Use to describe the image clearly. Helps accessibility and clarity for both users and crawlers.
  • Copyright Tag (EXIF): As of April 19, 2025, Google only parses the Copyright field. Put your keywords and geo info here if you are embedding metadata.

Example: “Professional Painting Services in Dallas, TX | Latitude: 32.7767, Longitude: -96.7970”

Metadata is dying in SEO, but the smart ones still squeeze juice where it counts.

How to Add EXIF Data in Photoshop

EXIF data is metadata embedded directly into your image file. Google used to parse multiple fields but now only respects the Copyright field. This is your last chance to attach keyword and location context at the file level.

  1. Open the image in Photoshop.
  2. Click File > File Info.
  3. Go to the Copyright field (ignore everything else).
  4. Type a natural sentence including your service and city. Example: Exterior Painting in Richmond VA | Latitude: 37.5407, Longitude: -77.4360
  5. Click OK and save the image with the new embedded metadata.
  • Pro tip: Use a spreadsheet to track which images you’ve tagged, especially on large sites.
  • Legal bonus: This field also protects you with a traceable ownership claim.

Tiny field, big impact. Only takes 30 seconds.

Step 4: File Format and Delivery

  • WebP is preferred: Use WebP or make sure your builder converts it during upload.
  • Fallback formats: Keep JPEG or PNG versions for compatibility in rare cases.
  • Avoid plugins: Convert and optimize images before upload to keep your stack lean.

Fewer plugins means faster sites. Handle your images up front.

Common Mistakes to Avoid

  • Uploading 5MB images: Nope. Resize it first.
  • Skipping alt text: That is a missed opportunity. Always describe the image purpose.
  • Using stock photos everywhere: Lowers trust and conversion. Use real imagery from the client when possible.
  • Duplicate file names: Especially on spun or location pages. Confuses crawlers and reduces index coverage.
  • Not using next-gen formats: WebP is lighter and faster. Use it when you can.

Images should build authority, not load time and bounce rate.

Recommended Tools for Image SEO

Editing and Metadata Tools

  • Adobe Bridge: Great for organizing and batch metadata changes
  • Lightroom: Excellent for quick edits, resizing, and exposure tweaks
  • Photoshop: Required for embedding EXIF data in Copyright field

Conversion and Performance Tools

  • Squoosh.app: Super simple image compression and WebP conversion
  • GTmetrix: Load speed and waterfall testing
  • Google PageSpeed Insights: Core Web Vitals and mobile friendliness

WordPress Plugins (if you must)

  • ShortPixel: Compression and WebP support, one of the best in the game
  • Smush: Easy to use for basic image compression inside WordPress

Tools don’t fix strategy. Know what you’re doing before you automate.